Saturday, February 27, 2010

Spicy American Wheat Ale: First All-Grain

My buddy gave me a couple of food-grade five gallon buckets the other day. BREWING TIME!

I'd been itching to do a wheat beer for a while now. We like wheat; she makes whole wheat bread, we eat whole wheat pasta, cream of wheat for breakfast...you get the idea. And to top it all off, she really likes Blue Moon. Witbier time!

But not exactly. This recipe fits the BJCP style guidelines for an American Wheat Beer, but is spiced in a classic Witbier way. The brew process was fun and smelled great. But most importantly, it was our first straight "grain to glass" brew. No extracts here folks, all fermentables came straight from the grain!

I was proud, calculations were spot-on, except for efficiency, which was underestimated. Our process was 88% efficient this session. That's higher than many commercial breweries! So here we go...


Spicy American Wheat Ale: All-Grain
4 gallon batch

Predicted OG: 1.052
Actual OG: 1.054

Predicted FG: 1.012

Fermentables:
-4 lbs US 2-row Pale Malt
-4 lbs Flaked Wheat

Hops:
-1 oz US Golding 4.5% (60 min)

Yeast:
-Safbrew WB-06 dry ale yeast

Others:
-0.75 oz crushed coriander
-0.75 oz dried orange peel (homemade)


Process:
We heated 3 gallons of water (1.5 qt water/1 lb of grain) to a strike temperature of 165 degrees Fahrenheit, with our trusty strainer bag secured to the pot's handles.
 

This temperature was calculated so that when the 8 pounds of 65 degree Fahrenheit grain hit the 3 gallons of 165 degree water, we would achieve a mash temperature of 153 degrees.  And sure enough, we hit it dead on.
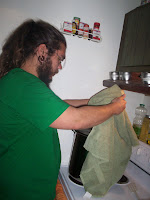
With the stove top now turned off, I stirred the mash heartily to break up any clumps.  Then we put the lid on the pot, wrapped a towel around it, and left it to mash at 153 for 60 minutes.  Using the simple towel method, we didn't lose a single degree Fahrenheit during the mash.
And no, the other end of the mash paddle is not in my nose, though that would be a neat trick.


Next I removed the grain bag (this is where bicep strength comes in!) and set it into our now-upgraded drip tray...another bucket!  Then I poured these first runnings into a food grade bucket, and poured 2.5 gallons of water into our pot.
 No need to be fancy unless you're a real stickler, I just measure gallons with an old juice jug


Then, once the 2.5 gallons of water reached 180 degrees, we turned off the burner and replaced the grain bag.  I stirred the grains once more with the mash paddle, then covered the pot and let it sit for 15 minutes.  This BIAB (brew in a bag) batch sparge method majorly contributes to the high efficiency of this system.
  
 After this 15 minute sparge, I removed the grain bag from the sparge water and returned it to the drip tray for its last drippings.  No waste in this brewhouse!  Or should I say brewpartment?  Anyway, now comes the fun part...


Combine the wort and the sparge water,

 Add the hops,

                                  And boil!

Important Note: Remember to watch your pot (contrary to old wives tales it will boil), and stir to prevent boil-over.  Hot break can be hellacious, and nobody wants to lose any of their beer, not to mention clean up sticky burnt wort.  The more head space your pot has, the better.  

After about 80 minutes of boiling we whipped out the trusty mini-food processor to crush the coriander.  I decided to throw the dried orange peels in there too, as they were pretty large pieces to begin with.  


If you aren't as frugal you could go buy bitter or sweet orange peel (drastically different, research first)  from your brew shop for about $1.50 to $2 an ounce.  But if you would like to use the same method we did, just peel your oranges with a paring knife, leaving as much pith (the bitter white part) on the fruit as possible.  Break the peels into your desired size, and set them out in a dry spot on a plate for 3-4 days.  You could expedite the process by putting them on a baking sheet in the oven at a low setting for an hour or two.  Use organic fruits if you want to make sure you're not drinking pesticides.

Then I poured the coriander and orange peel into a little nylon bag, tied it off, and dropped it in to boil for the last five minutes.  The short boil is to preserve delicate flavors and aromas that over-cooking can destroy.


Next, we started loading our sink with cold water and ice for the cooling.  We can cool to a respectable 100 degrees Fahrenheit in 30 minutes if we just replace the water when it is no longer cold, about once every 5 to 10 minutes in our sink.  


ALWAYS REMEMBER TO SANITIZE!
  Here I'm adding 1 tsp Iodophor to 1.5 gallons of water to sanitize the bucket, lid, mash paddle (for fishing out bags) and airlock.  Cooling is a prime time for this.

I removed the bags to a drip tray to save every possible drop,
  
Poured the cooled wort into the sanitized fermenting bucket,

Then topped off with the drippings.

We ended up just under the 4 gallon mark, so I added a little dechlorinated water to get us to the desired volume.


Took a hydrometer reading...
OG: 1.054

and pitched the yeast.  Now it's sitting on the right, next to our Engagement Day American Ale, bubbling away!  More updates at bottling time!


-Myles

Friday, February 26, 2010

Wheat Beer's a-mashin'

So, word on the street is, there's a 4 gallon batch of some killer spicy wheat beer brewing in the Bunker. RIGHT NOW. Pictures and details shall abound soon...provided these damn rechargeable batteries actually recharge!

-Myles
Wednesday, February 24, 2010

Old Sweaty Bitch Ale

This is the recipe for a super high gravity brew we started on 1/29/10. When I pitched the yeast (and un-rehydrated dry yeast at that!) it started bubbling within five minutes. I was amazed, I've never seen such a thing before, and I'm not sure if I will again.

UPDATE 2/24/10:
This stuff tastes incredible, even pre-carbed, at 10.65%ABV. It's ended where I expected it to end with the Safbrew S33's alcohol tolerance of 11%, and we've opted to not dry it out further with champagne yeast. We're bottling tonight, should be done in a few weeks, but no matter how awesome this killer brew is, we're holding some back for the ages...this one's definitely a keeper! Pictures soon!

2/25/10


Didn't get as much as we wanted, because I agitated the carboy a little too much when priming, causing sediment to rise. Here I am looking forlornly at the minuscule amount of wasted beer.


We also had one hell of a time bottling, siphon issues, and our racking cane even snapped!


But just get a load of that good bit of high gravity brew!


Old Sweaty Bitch


2.5 gallon batch

Actual SG:1.110

Estimated FG:1.022
Estimated ABV: 11.55%

Actual FG: 1.031
Actual ABV: 10.65%


Extracts:
3.3 lbs Muntons light LME
2.5 lbs Briess Pilsen light DME
1 lb light brown sugar

Crushed Grains:
0.5 lbs Briess Crystal 60L
0.5 lbs Briess Chocolate 350L
0.25 lbs Muntons Carapils 20L

Hops:
UK Fuggle 4.0% 60 min.
US Golding 4.9% 60 min

Yeast:
Safbrew S33, pitched directly into primary

Procedure:
Steeped grains for one hour, slowly raising temp from 140F to 157F. Removed grain bag and sparged with 155F water. Added malt extracts and hops bags and boiled for one hour. Cooled to 71F, pitched dry yeast, and fit with blow off tube.

This one started vigorously bubbling immediately, not surprising with the high SG. But I didn't realize just how vigorous it would bubble until it started overflowing my shot glass, then my butter tub, with loads of goopy foam.

So I rigged the tube into my old empty Mr. Beer barrel and, after the initial blow up, poured all the blown-off beer/ foam back into my primary and fit with an airlock (Sorry, camera had died by then). It's slowed now, bubbling every once in a while, but I still shake it every day and get a burst of bubbles. Added a tsp of yeast nutrient on 2/8/10, and if the FG is too high, I'm going to toss in a little champagne yeast.

I'm super hyped to age this one and give it to a few select friends with an affinity for strong drink!

-Myles Nestok

P.S. -- Don't forget to soap up and pour out the gunk, unless you're harvesting yeast.

beautiful

Frostbit Dick Dry Stout

*no genitalia were harmed in the making of this beer

So it was 18 degrees Fahrenheit out, with windchill making it feel more like 5. But we were determined. Glorious stepfather Sandy gifted us a 3 gallon glass carboy for Christmas, and we were going to make beer dammit!

We walked three miles through a blizzard of snow that fateful January day, when we brewed our first partial mash beer from a self-made recipe. And it turned out good. Dark and roasty, with hints of burnt coffee flavor without an overly bitter finish.

Frostbit Dick
2.5 gallon batch

OG: 1.050
FG: 1.021
ABV: 4.07%

Fermentables:
-1/2 can Munton's Dark LME (2 cups, or 1.65 lb)
-1 lb Briess Dark DME
-1 lb Weyermann Carafa Special III

Hops:
-1 oz Northern Brewer pellet hops AA 8.5%
-1 oz Hallertau pellet hops AA 4.5%

Yeast:
Safbrew S33, 11.5g (1 packet)

Procedure:
We bought the Carafa whole, so we put the grains in a freezer bag and crushed them with the bottom of a glass bottle. Then we put the grains in a nylon mesh back, tied it off, and boiled it in 1 gallon of water for 1 hour, along with the dark liquid malt extract and the Northern Brewer hops (in a muslin bag). Next we let the wort cool for a moment, then poured into the carboy.

Important: make SURE you do not pour hot liquid into glass containers; you will not only end up with a mess, but probably a few severed digits too. In retrospect, we should have cooled the wort longer

Then we discarded the grains, and with the hops bag still in our tiny pot (we had yet to upgrade), we boiled the dry malt extract in 1 gallon of water for 1 hour. Let cool, poured into carboy, and topped off with cool tap water. Dry hopped with the 1 oz Hallertau for 2 days, pre-fermentation.

We pitched the dry yeast on 1/4/2010, and fermentation was noticeable within 48 hours. Fermentation ceased on 1/26/2010, at which point we primed each 12 oz bottle with 3/4 tsp corn sugar, the old-fashioned way.

Looking back on this beginners' quest into brewing, I would have changed alot of things. The Carafa would be steeped, not boiled. The dry hopping would probably be converted to a late hop addition during the boil. We would have used light LME, rather than dark (more fermentables). We would have bulk primed, rather than priming bottle-to-bottle.


But doesn't that look like a damn fine brew? It sure tastes like it!


-Myles Nestok
Monday, February 22, 2010

Supreme Irish Cream

Do you love the sweet silky flavor of a cup of Irish Cream at dessert, but can't stand paying the outrageous price? ($17 for a small bottle of Bailey's?!) Neither can we, so we make it ourselves. Cheaper, fresher, and tastier. I believe this recipe was posted by a certain "Mom" on allrecipes.com once. More or less vanilla or almond extract can be used if desired, or omitted all together. Some people say this recipe makes it a little strong on the alcoholic side, but we find it just right.

Supreme Irish Cream
yields just over 4 cups, or a little bit more than a 750 ml bottle (drink the extra!)

Ingredients:
-1 cup (1/2 pt) heavy/whipping cream
-1 (14 oz) can sweetened condensed milk
-1 and 2/3 cup Irish Whiskey (or Scotch, or Bourbon...but then you'd have some KY Cream)haha
-1 tsp instant coffee granules
-2 tbsp chocolate syrup
-1 tsp vanilla extract
-1 tsp almond extract

Directions:
Blend like hell in a blender, or with a wire whisk. Pour into cleaned bottle and refrigerate. Improves after a night in the fridge, the flavors have time to meld.

This stuff turns even the crappiest coffee into ambrosia.

Apple Wine

This stuff is easy as pie and cheap as mud.  Damn I could go for a mud pie.

Based off of an extremely popular recipe found here, I just scaled it down to do two gallons, and changed ingredients just a little bit.  It yields a very dry wine of about 10% ABV, and can be carbonated like beer to make a knock-you-on-your-ass cider.  Here it is:

Simple Apple Wine, 2 gallons (thank you for inspiration, EdWort)

Ingredients:
- 2 gallons of Apple Juice (no preservatives added, but ascorbic acid is fine)
-1 lb white granulated sugar
-2 tsp yeast nutrient (optional)

Yeast:
Montrachet wine yeast

Directions:
Mix all that stuff up in a pot (or your fermentation vessel), and take a gravity reading.  Don't worry about boiling or any of that crap, the commercial juices are pasteurized.  You could boil the yeast nutrient in a bit of water if you're really worried, but what's the point of worrying?

Our original gravity reading was 1.071.  Then open your little yeast packet and pour it in there, and fit with an airlock.  We mixed everything in a bigger pot since we use 1 gallon jug fermentors then split evenly airlocked each.

Seriously, make some of this stuff, you'll love it.

-Myles Nestok

Thursday, February 18, 2010

Cure-All

Here's the recipe for a small (2 gallon) batch I bottled and corked the other day. I tasted the hydrometer's share to make sure it didn't need to be sweetened (FG was 1.001!) and it was amazingly smooth, especially considering the high alcohol content. Carla doesn't like chamomile or mint, but she loves this wine. We're excited to see what age will do to it!

With the antioxidants and beta-carotene of carrots, anti-inflammatory and soothing effects of chamomile, and digestive healing powers of mint, who's to say it isn't a cure-all? If you use tea bags for your chamomile and/or mint, make sure the only ingredient in the tea is its respective herb. The measurements are in grams because each Bigelow tea bag I had contained one gram of material.


Cure-All

SG: 1.121
FG:1.001
ABV: 15.75%

Ingredients:
-10 g dried chamomile
-8 g dried mint
-2 black tea bags
-5 lbs carrots, chopped but not skinned (you can save these to eat!)
-handful of raisins (optional)
-2 tsp yeast nutrient

Yeast:
Montrachet dry wine yeast

Sugar:
5 lbs white granulated

Directions:
Boil the chopped carrots in a little over 2 gallons of water, or as much as your container will hold, until they are soft to the touch. Remove carrots through straining and throw them in the fridge to heat up as a quick side dish later (throw some butter and chili salt on there!) Turn off heat and steep all tea bags/herbs in carrot water for 10 minutes. Remove tea bags, stir in 5 lbs white granulated sugar. Pour into fermentation vessel (I used two 1 gal glass jugs from commercial crapper wine), top off with water if needed, pitch yeast and nutrient, fit with airlock.

My batch was started on 12/30/09 and bottled on 2/7/10, with fermentation at 64-66 degrees Fahrenheit. You could ferment at a higher temperature to finish it quicker, but I'm not sure if it would taste quite as smooth as it does this way. It's a full-bodied elixir, silky smooth...mmm!

Wednesday, February 17, 2010

Engagement/Valentine's Day American Ale

Valentine's Day is my lady's favorite holiday. I planned on popping the question months in advance, and when she suggested we make her favorite holiday coincide with brew day, I was excited. We brewed a basic American Ale, with more grain than we've ever used before (62.3 percent of the fermentables!) I proposed during the cooling period, and she accepted.  Then we went to Elsa's and ate like gluttons and drank Bad Juans (strong but tasty margaritas!) Here's the recipe, followed by a pictorial tutorial:


UPDATE 3/8/10:
Bottling time!  We bottled this last night, so the Final Gravity and bottling pictures are below.  And it meets BJCP guidelines for American Pale Ale!  Success!

VD American Ale

Original Gravity: 1.062

Final Gravity: 1.015
ABV: 6.17%

Fermentables
5 lbs US Pale 2 row Malt
1 lb US Victory Malt
0.25 lb US Carapils Malt
3.3 lbs Briess Golden Light Liquid Malt Extract
0.5 lb generic honey

Hops

US Cascade 7.5 % 1.00 oz Loose Pellet Hops 60 Min From End
US Cascade 7.5 % 1.00 oz Loose Pellet Hops 10 Min From End


Yeast
Safale US-05

Others
1 tsp Irish Moss at 15 Min From End


Left to right: 3.3 lbs Golden Light Liquid Malt Extract, 2 oz Cascade pellet hops, grains milled at brew shop (5 lbs Pale Malt, 1 lb Victory Malt, .25 lbs Carapils Malt), dry yeast, Irish Moss, Iodophor (sanitizer), honey


First we used 2 clips to secure our super large straining bag, partially rolled up, into our 22 quart kettle.


We heated 2.5 gallons of water in the giant pot on our tiny stove until it reached 164 degrees Fahrenheit, then shut off the power. This is called the strike temperature because...


...it's that temperature before the grains strike! We heated to 164, calculating that with our grains at the kitchen's ambient temperature (65 degrees), we would get a 152-153 degree mash.

After pouring all our grains in the bag and stirring to break up any clumps, we took a temperature reading, and were right on the money with 153 degrees Fahrenheit. So we put a lid on it, wrapped a towel around it (all to maintain the heat for the full 60 minute mash), and drank a homebrew!


Of course, I had her pose in front of the kettle with the mash paddle first.


This was some of our first 2.5 gallon batch from after Christmas (thanks for the carboy Sandy!), a Dry Stout. It's thick and roasty, with a strong bitterness reminiscent of burnt coffee. With an ABV of 4.1%, it's a good beer to drink when a strong taste is desired, but the day is still young.

After the 60 minute mash we had to remove the grains to pour the first runnings into a bucket. I lifted out the swollen grain sack, and put it in this severely undersized drip-catcher,

poured the wort into a bucket,


and started heating another 2.5 gallons of water in the pot for the sparge. Once the water was around 180 degrees, I transferred the grain bag into the water to extract as much remaining sugar as we could from the grains.


As we waited on the water to work its magic I weighed out the honey.


After about 10 minutes, I removed the grain bag, and set it back in our tiny pot for one last drip session before meeting the garbage disposal.


In later calculations, I found our process this session to be 85% efficient! Next we poured the first runnings back into the kettle and cranked the heat up to get that sucker boiling. We also added the first ounce of boiling hops.


At this time we stir like hell to prevent the hot break (coagulating proteins) from boiling over. We did a good job on this one, it was probably our cleanest brew to date. Towards the 45 minute mark we added our honey and liquid malt extract. We did this late in the boil to prevent carmelization.


We added the second ounce of hops, in a muslin grain bag, 10 minutes before the end of the boil. Then we turned the heat off, filled the sink with ice, and set the kettle in it's cooling bath.

She went to shower so I dressed up real purdy. When she came out I took a knee, and asked that woman to marry me. She said yes and my systolic pressure dropped 20 points. Don't worry though, the greasy goodness of Elsa's made up for it! Here I am taking the hops bags out:

heheh

And here she is with her necklace and ring! Isn't she pretty?


Another happy homebrewing couple! We're going to try to have only our own beer at the wedding reception...fitting, isn't it?

-Myles Nestok


Oh yeah, and of course, after cooling (and 3 plates of food and 2 Bad Juans!) we poured into the fermentor, pitched the dry yeast, and fit with an airlock. Cheers!


Bottling time:
 
Isn't that beautiful beer?

Just grab...


And go!


Look at all that beer...

And if you're thinking of popping the question yourself, accompanied by a gorgeous bouquet,  check out the coupons here.  20% off is no joke!