So, you're tired of drinking bottom-shelf vodka, but you can't afford to drink Grey Goose and Belvedere all the time, or your just fed up with outrageous prices.
Time to bust out the charcoal! No, not the briquettes you use to grill with. I'm talking about activated charcoal, aka activated carbon. The same stuff that's in most home water filters (BRITA, anyone?). The stuff looks like gunpowder and is really cheap, despite what the filter company may try to tell/sell you.
My local homebrew shop carries bags of the stuff, and in fact it was Mike Schwartz, owner of Belmont Party Supply, who turned us on to it. As my fiance and I stood in line holding our 1.75 L bottle of Kamchatka, Mr. Schwartz explained that we could turn our bottom-shelf beverage into a product comparable to Grey Goose with a few simple steps. And boy was he ever right! A few runs through this system and you'll have your friends wondering why you're serving good stuff instead of your usual swill. Hell, go ahead and put it in a bottle labeled "house vodka". Best part is, you can use this system for water too, although I wouldn't use the same charcoal!
If you don't have an awesome homebrew shop, look at pet supply stores or water specialists. The same stuff is used in aquarium filters.
This is really easy. Here we go:
Easy Liquid Filter
Materials:
-pinch of activated charcoal
-2 liter or other plastic food-grade bottle with plastic cap
-coffee filter
-sharp knife
-collection vessel
1. Cut the clean and rinsed 2 liter bottle in half, discard lower half
2. Poke a few holes in the bottle cap with your knife, and screw it on tight.
3. Invert the bottle's top half (makeshift filtration vessel) and line the inside with your coffee filter. You might want to run a little water into it to get the filter to adhere to the bottle. The filter should cover the holes you poked in the lid.
4. Put a little pinch of your activated charcoal in the rig.
5. Pour vodka or whatever you want to filter into your new tool. Just make sure you have something to catch your filtered liquid underneath! Usually I just set the bottle-half on top of a big glass.
And that's it! One run through and your vodka will improve noticeably, two runs and you won't even recognize it. This smooths and mellows out the flavor so much you'll want to start drinking it straight (wuss). Alternatively, you could tie the activated charcoal into a tea bag and swish it around in your vodka for a while, or you could just dump some straight in your bottle and shake it. I prefer using a filter because I don't like granules of stuff in my vodka, although consuming the charcoal won't hurt you. If you want to be really fancy, try running the vodka through five or six times. All of a sudden that "six times charcoal-filtered" label on the bottle of Ripovf vodka eight shelves up doesn't seem so daunting, does it?
What exactly is happening in your simple filter? Well, fusel oils (a major hangover cause) and other bad-tasting/smelling impurities are being absorbed into the charcoal's many pores, leaving us with a purer product. If you filter your water, it will absorb the chlorine, among other things. But remember, your little pinch of charcoal can only absorb a certain amount. You can work off the same pinch for a while, but you'll definitely be able to tell when it's no longer working by the change in taste...and you'll remember why you started doing this in the first place! Just toss your used charcoal and load the filter with a new pinch. Good as new.
You can use this method for other spirits, but remember, charcoal-filtration will change the flavor. Some impurities give certain alcohols their characteristics; for example, you don't want to filter bourbon. The best effects are achieved by starting with neutral spirits, e.g. vodka, gin, grain alcohol (everclear). Although I must say, one of my best homemade wines ever was a batch of blueberry, charcoal-filtered and fortified with brandy.
If you already have one of the pitcher-type water filters, you could just run your vodka through there a few times and have a comparable product. But look into buying some activated charcoal, and get a load of this. No harm in saving a few bucks, right?
-Myles
P.S. - Send me a bottle of your filtered vodka and I'll tell you if you did it right
Showing posts with label easy. Show all posts
Showing posts with label easy. Show all posts
Wednesday, March 3, 2010


Saturday, February 27, 2010
Spicy American Wheat Ale: First All-Grain
My buddy gave me a couple of food-grade five gallon buckets the other day. BREWING TIME!
I'd been itching to do a wheat beer for a while now. We like wheat; she makes whole wheat bread, we eat whole wheat pasta, cream of wheat for breakfast...you get the idea. And to top it all off, she really likes Blue Moon. Witbier time!
But not exactly. This recipe fits the BJCP style guidelines for an American Wheat Beer, but is spiced in a classic Witbier way. The brew process was fun and smelled great. But most importantly, it was our first straight "grain to glass" brew. No extracts here folks, all fermentables came straight from the grain!
I was proud, calculations were spot-on, except for efficiency, which was underestimated. Our process was 88% efficient this session. That's higher than many commercial breweries! So here we go...
Spicy American Wheat Ale: All-Grain
 4 gallon batch
Predicted OG: 1.052
Actual OG: 1.054
Predicted FG: 1.012
-0.75 oz crushed coriander
-0.75 oz dried orange peel (homemade)
Process:
We heated 3 gallons of water (1.5 qt water/1 lb of grain) to a strike temperature of 165 degrees Fahrenheit, with our trusty strainer bag secured to the pot's handles.


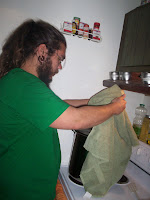
 With the stove top now turned off, I stirred the mash heartily to break up any clumps. Then we put the lid on the pot, wrapped a towel around it, and left it to mash at 153 for 60 minutes. Using the simple towel method, we didn't lose a single degree Fahrenheit during the mash.


 Here I'm adding 1 tsp Iodophor to 1.5 gallons of water to sanitize the bucket, lid, mash paddle (for fishing out bags) and airlock. Cooling is a prime time for this.


I'd been itching to do a wheat beer for a while now. We like wheat; she makes whole wheat bread, we eat whole wheat pasta, cream of wheat for breakfast...you get the idea. And to top it all off, she really likes Blue Moon. Witbier time!
But not exactly. This recipe fits the BJCP style guidelines for an American Wheat Beer, but is spiced in a classic Witbier way. The brew process was fun and smelled great. But most importantly, it was our first straight "grain to glass" brew. No extracts here folks, all fermentables came straight from the grain!
I was proud, calculations were spot-on, except for efficiency, which was underestimated. Our process was 88% efficient this session. That's higher than many commercial breweries! So here we go...
Spicy American Wheat Ale: All-Grain
 4 gallon batch
Predicted OG: 1.052
Actual OG: 1.054
Predicted FG: 1.012
Fermentables:
-4 lbs US 2-row Pale Malt
-4 lbs Flaked Wheat
 Hops:
Hops:
-1 oz US Golding 4.5% (60 min)
Yeast:
-Safbrew WB-06 dry ale yeast
-4 lbs US 2-row Pale Malt
-4 lbs Flaked Wheat
 Hops:
Hops:-1 oz US Golding 4.5% (60 min)
Yeast:
-Safbrew WB-06 dry ale yeast
Others:
-0.75 oz dried orange peel (homemade)
Process:
We heated 3 gallons of water (1.5 qt water/1 lb of grain) to a strike temperature of 165 degrees Fahrenheit, with our trusty strainer bag secured to the pot's handles.


This temperature was calculated so that when the 8 pounds of 65 degree Fahrenheit grain hit the 3 gallons of 165 degree water, we would achieve a mash temperature of 153 degrees. And sure enough, we hit it dead on.

 With the stove top now turned off, I stirred the mash heartily to break up any clumps. Then we put the lid on the pot, wrapped a towel around it, and left it to mash at 153 for 60 minutes. Using the simple towel method, we didn't lose a single degree Fahrenheit during the mash.
And no, the other end of the mash paddle is not in my nose, though that would be a neat trick.

Next I removed the grain bag (this is where bicep strength comes in!) and set it into our now-upgraded drip tray...another bucket! Then I poured these first runnings into a food grade bucket, and poured 2.5 gallons of water into our pot.


No need to be fancy unless you're a real stickler, I just measure gallons with an old juice jug
Then, once the 2.5 gallons of water reached 180 degrees, we turned off the burner and replaced the grain bag. I stirred the grains once more with the mash paddle, then covered the pot and let it sit for 15 minutes. This BIAB (brew in a bag) batch sparge method majorly contributes to the high efficiency of this system.


After this 15 minute sparge, I removed the grain bag from the sparge water and returned it to the drip tray for its last drippings. No waste in this brewhouse! Or should I say brewpartment? Anyway, now comes the fun part...
Combine the wort and the sparge water,

Add the hops,

And boil!

Important Note: Remember to watch your pot (contrary to old wives tales it will boil), and stir to prevent boil-over. Hot break can be hellacious, and nobody wants to lose any of their beer, not to mention clean up sticky burnt wort. The more head space your pot has, the better.
After about 80 minutes of boiling we whipped out the trusty mini-food processor to crush the coriander. I decided to throw the dried orange peels in there too, as they were pretty large pieces to begin with.

If you aren't as frugal you could go buy bitter or sweet orange peel (drastically different, research first) from your brew shop for about $1.50 to $2 an ounce. But if you would like to use the same method we did, just peel your oranges with a paring knife, leaving as much pith (the bitter white part) on the fruit as possible. Break the peels into your desired size, and set them out in a dry spot on a plate for 3-4 days. You could expedite the process by putting them on a baking sheet in the oven at a low setting for an hour or two. Use organic fruits if you want to make sure you're not drinking pesticides.


Then I poured the coriander and orange peel into a little nylon bag, tied it off, and dropped it in to boil for the last five minutes. The short boil is to preserve delicate flavors and aromas that over-cooking can destroy.


Next, we started loading our sink with cold water and ice for the cooling. We can cool to a respectable 100 degrees Fahrenheit in 30 minutes if we just replace the water when it is no longer cold, about once every 5 to 10 minutes in our sink.
ALWAYS REMEMBER TO SANITIZE!

I removed the bags to a drip tray to save every possible drop,

Poured the cooled wort into the sanitized fermenting bucket,

Then topped off with the drippings.


We ended up just under the 4 gallon mark, so I added a little dechlorinated water to get us to the desired volume.

Took a hydrometer reading...

OG: 1.054
and pitched the yeast. Now it's sitting on the right, next to our Engagement Day American Ale, bubbling away! More updates at bottling time!

-Myles
Wednesday, February 24, 2010
Frostbit Dick Dry Stout
*no genitalia were harmed in the making of this beer
So it was 18 degrees Fahrenheit out, with windchill making it feel more like 5. But we were determined. Glorious stepfather Sandy gifted us a 3 gallon glass carboy for Christmas, and we were going to make beer dammit!
We walked three miles through a blizzard of snow that fateful January day, when we brewed our first partial mash beer from a self-made recipe. And it turned out good. Dark and roasty, with hints of burnt coffee flavor without an overly bitter finish.
Frostbit Dick
2.5 gallon batch
OG: 1.050
FG: 1.021
ABV: 4.07%
Fermentables:
-1/2 can Munton's Dark LME (2 cups, or 1.65 lb)
-1 lb Briess Dark DME
-1 lb Weyermann Carafa Special III
Hops:
-1 oz Northern Brewer pellet hops AA 8.5%
-1 oz Hallertau pellet hops AA 4.5%
Yeast:
Safbrew S33, 11.5g (1 packet)
Procedure:
We bought the Carafa whole, so we put the grains in a freezer bag and crushed them with the bottom of a glass bottle. Then we put the grains in a nylon mesh back, tied it off, and boiled it in 1 gallon of water for 1 hour, along with the dark liquid malt extract and the Northern Brewer hops (in a muslin bag). Next we let the wort cool for a moment, then poured into the carboy.
Important: make SURE you do not pour hot liquid into glass containers; you will not only end up with a mess, but probably a few severed digits too. In retrospect, we should have cooled the wort longer
Then we discarded the grains, and with the hops bag still in our tiny pot (we had yet to upgrade), we boiled the dry malt extract in 1 gallon of water for 1 hour. Let cool, poured into carboy, and topped off with cool tap water. Dry hopped with the 1 oz Hallertau for 2 days, pre-fermentation.
We pitched the dry yeast on 1/4/2010, and fermentation was noticeable within 48 hours. Fermentation ceased on 1/26/2010, at which point we primed each 12 oz bottle with 3/4 tsp corn sugar, the old-fashioned way.
Looking back on this beginners' quest into brewing, I would have changed alot of things. The Carafa would be steeped, not boiled. The dry hopping would probably be converted to a late hop addition during the boil. We would have used light LME, rather than dark (more fermentables). We would have bulk primed, rather than priming bottle-to-bottle.

So it was 18 degrees Fahrenheit out, with windchill making it feel more like 5. But we were determined. Glorious stepfather Sandy gifted us a 3 gallon glass carboy for Christmas, and we were going to make beer dammit!
We walked three miles through a blizzard of snow that fateful January day, when we brewed our first partial mash beer from a self-made recipe. And it turned out good. Dark and roasty, with hints of burnt coffee flavor without an overly bitter finish.
Frostbit Dick
2.5 gallon batch
OG: 1.050
FG: 1.021
ABV: 4.07%
Fermentables:
-1/2 can Munton's Dark LME (2 cups, or 1.65 lb)
-1 lb Briess Dark DME
-1 lb Weyermann Carafa Special III
Hops:
-1 oz Northern Brewer pellet hops AA 8.5%
-1 oz Hallertau pellet hops AA 4.5%
Yeast:
Safbrew S33, 11.5g (1 packet)
Procedure:
We bought the Carafa whole, so we put the grains in a freezer bag and crushed them with the bottom of a glass bottle. Then we put the grains in a nylon mesh back, tied it off, and boiled it in 1 gallon of water for 1 hour, along with the dark liquid malt extract and the Northern Brewer hops (in a muslin bag). Next we let the wort cool for a moment, then poured into the carboy.
Important: make SURE you do not pour hot liquid into glass containers; you will not only end up with a mess, but probably a few severed digits too. In retrospect, we should have cooled the wort longer
Then we discarded the grains, and with the hops bag still in our tiny pot (we had yet to upgrade), we boiled the dry malt extract in 1 gallon of water for 1 hour. Let cool, poured into carboy, and topped off with cool tap water. Dry hopped with the 1 oz Hallertau for 2 days, pre-fermentation.
We pitched the dry yeast on 1/4/2010, and fermentation was noticeable within 48 hours. Fermentation ceased on 1/26/2010, at which point we primed each 12 oz bottle with 3/4 tsp corn sugar, the old-fashioned way.
Looking back on this beginners' quest into brewing, I would have changed alot of things. The Carafa would be steeped, not boiled. The dry hopping would probably be converted to a late hop addition during the boil. We would have used light LME, rather than dark (more fermentables). We would have bulk primed, rather than priming bottle-to-bottle.

But doesn't that look like a damn fine brew? It sure tastes like it!
-Myles Nestok
Monday, February 22, 2010
Supreme Irish Cream
Do you love the sweet silky flavor of a cup of Irish Cream at dessert, but can't stand paying the outrageous price? ($17 for a small bottle of Bailey's?!) Neither can we, so we make it ourselves. Cheaper, fresher, and tastier. I believe this recipe was posted by a certain "Mom" on allrecipes.com once. More or less vanilla or almond extract can be used if desired, or omitted all together. Some people say this recipe makes it a little strong on the alcoholic side, but we find it just right.
Supreme Irish Cream
yields just over 4 cups, or a little bit more than a 750 ml bottle (drink the extra!)
Ingredients:
-1 cup (1/2 pt) heavy/whipping cream
-1 (14 oz) can sweetened condensed milk
-1 and 2/3 cup Irish Whiskey (or Scotch, or Bourbon...but then you'd have some KY Cream)haha
-1 tsp instant coffee granules
-2 tbsp chocolate syrup
-1 tsp vanilla extract
-1 tsp almond extract
Directions:
Blend like hell in a blender, or with a wire whisk. Pour into cleaned bottle and refrigerate. Improves after a night in the fridge, the flavors have time to meld.
This stuff turns even the crappiest coffee into ambrosia.
Supreme Irish Cream
yields just over 4 cups, or a little bit more than a 750 ml bottle (drink the extra!)
Ingredients:
-1 cup (1/2 pt) heavy/whipping cream
-1 (14 oz) can sweetened condensed milk
-1 and 2/3 cup Irish Whiskey (or Scotch, or Bourbon...but then you'd have some KY Cream)haha
-1 tsp instant coffee granules
-2 tbsp chocolate syrup
-1 tsp vanilla extract
-1 tsp almond extract
Directions:
Blend like hell in a blender, or with a wire whisk. Pour into cleaned bottle and refrigerate. Improves after a night in the fridge, the flavors have time to meld.
This stuff turns even the crappiest coffee into ambrosia.
Subscribe to:
Posts (Atom)


